Introduction
How to make a fence is a vital part of Minecraft! Fences are essential elements in Minecraft that serve multiple purposes. They keep your animals contained, protect your property from wandering mobs, and add aesthetic appeal to your builds.
This guide is a great recipe for fences which will walk you through everything you need to know about crafting and using fences in Minecraft, but below steps require a crafting table to be ready and handy. If you haven’t created your crafting table yet, read this How to set up your crafting table in Minecraft. Below in the article you will find a recipe for fence and a recipe for a gate.
Required Materials
To make a basic wooden fence, you’ll need:
- 4 wooden planks (any type)
- 2 sticks
For a fence gate, you’ll need:
- 4 wooden planks (any type)
- 2 sticks
Step-by-Step Instructions
Making Wooden Sticks
- Open your crafting table by right-clicking on it.
- Place wooden planks in the middle and bottom squares of the first column.
- Collect the sticks from the output slot.
Crafting Wooden Fences
- Open your crafting table.
- Place wooden planks in the first and second rows of the first and third columns.
- Then, place sticks in the first and second rows of the middle column.
- The crafting pattern looks like this:
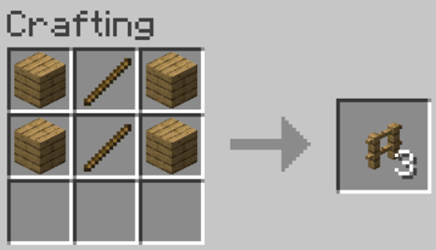
This recipe yields 3 fence pieces.
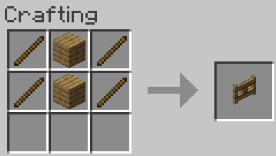
Crafting a Fence Gate
- Open your crafting table.
- Place wooden sticks in the first and second rows of the first and third columns.
- Then, place planks in the first and second rows of the middle column.
- The crafting pattern looks like this:
Types of Fences
Minecraft offers various fence types, each made from different wood varieties:
- Oak fence
- Spruce fence
- Birch fence
- Jungle fence
- Acacia fence
- Dark oak fence
- Crimson fence (made from crimson stems in the Nether)
- Warped fence (made from warped stems in the Nether)
Additionally, there’s the nether brick fence, which has a unique recipe using nether bricks instead of wooden planks.
Tips & Tricks
Placement Tips
- Fences connect automatically to adjacent fence blocks.
- Fences are 1.5 blocks tall, preventing most mobs and players from jumping over them.
- You can place fence gates between fence sections for easy access.
- Attach fence gates directly to solid blocks for a cleaner look.
Design Ideas
- Mix different fence types for interesting patterns.
- Use fences as supports for elevated structures.
- Combine fences with walls for varied height barriers.
- Place torches on fences for elevated lighting.
Lesser-Known Features
- You can tie lead (leash) to fences to keep animals tethered.
- Mobs cannot see through fences when in pursuit, making them useful defensive structures.
- Banners can be attached to fences.
Troubleshooting
Common Issues
- Fences not connecting properly: Make sure there are no invisible blocks (like snow layers) between fence sections.
- Can’t place fence: Ensure you’re placing it on a valid surface. Fences need solid blocks beneath them.
- Animals escaping: Check for diagonal gaps or areas where the terrain height might allow jumping over the fence.
Advanced Techniques
Combining with Redstone
- Fence gates can be controlled with redstone circuits.
- Use pressure plates in front of fence gates for automatic opening.
Animal Management
- Create double-high fences for rabbit enclosures as they can jump over single fences.
- Use carpets on top of fences as a way for players to get over without breaking the fence or using gates.
Conclusion
Fences are versatile building elements in Minecraft that provide both functional and aesthetic benefits. Whether you’re creating a simple animal pen or designing an elaborate castle perimeter, mastering fence crafting is essential for any Minecraft player.
Experiment with different wood types and designs to find what works best for your building style. Remember that practice makes perfect!