Introduction
How to set up your first crafting table in Minecraft is an essential step of everything you’ll build in Minecraft. Without this crucial block, you’ll be limited to the tiny 2×2 crafting grid in your inventory, preventing you from creating most items in the game.
In this guide we will walk you through how to set up your first crafting table in Minecraft as quickly as possible, setting you up for success in your Minecraft adventure.
Required Materials to set up your first crafting table
To create a crafting table, you’ll need:
- 4 wooden planks (any wood type)
For gathering these materials, you’ll need:
- Your bare hands (initially)
- A wooden axe (optional, but helpful)
Step-by-Step Instructions
Step 1: Gather Wood
- Find a tree in your world.
- Punch the tree trunk with your hand (hold left-click).
- Then, collect at least 1-2 logs that drop when the wood blocks break.
- Pro tip: Focus on gathering oak, spruce, birch, or jungle wood first, as they’re the most common.
Step 2: Convert Logs to Wooden Planks
- Open your inventory (press ‘E’ on PC/Mac, ‘X’ on Xbox, ‘Triangle’ on PlayStation, or ‘Y’ on Nintendo).
- Place the logs in any slot of your 2×2 crafting grid (top-right of inventory).
- Collect the wooden planks that appear in the result box.
- Each log converts to 4 wooden planks.
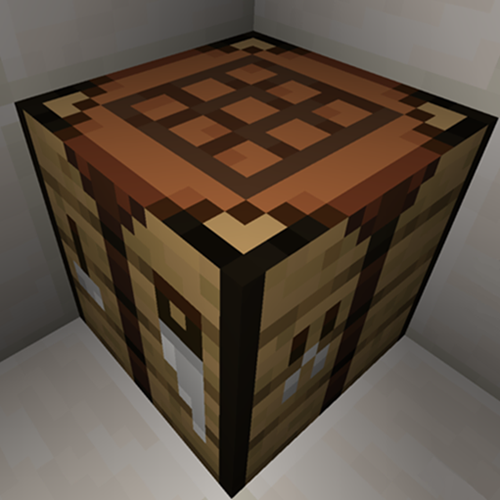
Step 3: Craft Your Crafting Table
- While still in your inventory, place one wooden plank in each of the four squares of your 2×2 crafting grid.
- The pattern should then look like this:
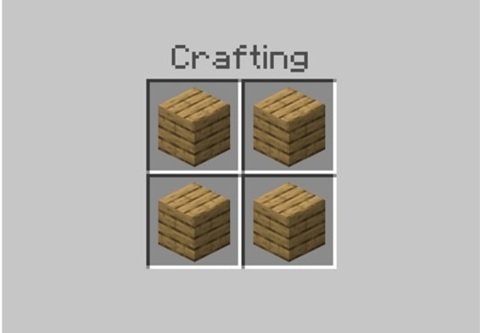
- Collect the crafting table that appears in the result box.
Step 4: Place Your Crafting Table
- Add the crafting table to your hotbar (the row of 9 slots at the bottom of your inventory).
- Close your inventory (press ‘E’ again or the equivalent button).
- Select the crafting table in your hotbar.
- Then, place it in the world by right-clicking on the ground or another solid block.
Step 5: Using Your Crafting Table
- Approach the placed crafting table.
- Right-click on it to open the 3×3 crafting grid interface.
- You can now craft any item in the game that requires a 3×3 grid.
Tips & Tricks
Efficiency Tips
- Craft multiple crafting tables and keep one in your inventory at all times.
- Place crafting tables at key locations in your base for easy access.
- If you’re gathering wood, consider making a wooden axe first for faster collection.
First Items to Craft
Now that you have a crafting table, consider making these essential items next:
- Wooden pickaxe (to mine stone)
- Stone pickaxe (upgrade from wooden)
- Furnace (for smelting ores and cooking food)
- Chest (for storing items)
- Wooden door (for securing your first shelter)
Wood Types
All wood types work equally well for crafting tables, but they have different appearances:
- Oak: Classic brown
- Spruce: Darker brown
- Birch: Pale, almost white
- Jungle: Reddish-brown
- Acacia: Orange-tinted
- Dark Oak: Very dark brown
- Crimson: Red (Nether)
- Warped: Teal (Nether)
Troubleshooting
Common Issues
- Can’t place crafting table: Ensure you’re pointing at a valid surface and not trying to place it in mid-air or on a non-solid block.
- Crafting table disappears when placed: Check if you’re playing in a protected area on a multiplayer server.
- Items not appearing in the crafting grid: Make sure you’re placing ingredients in the correct pattern.
For Beginners
- If you’re having trouble finding trees, try moving to a different biome.
- Don’t worry about wasting materials; wood is abundant in most Minecraft worlds.
- Remember to break and collect your crafting table before moving to a new location.
Advanced Techniques
Crafting Station Setup
As you progress, consider creating a dedicated crafting station with:
- Crafting table
- Furnace
- Chest
- Stonecutter (for stone-related items)
- Loom (for banners and dyed items)
- Smithing table (for upgrading tools)
- Grindstone (for repairing and removing enchantments)
Efficiency Layout
- Place frequently used crafting stations close together.
- Use hoppers to feed materials into furnaces automatically.
- Build your crafting area near your storage system for easy access to materials.
Conclusion
Now that you have set up your first crafting table in Minecraft, your have opened your gateway to the full Minecraft experience. With this essential block, you’ll be able to create tools, weapons, armor, and countless other items needed for survival and creativity. Remember to make this your first priority in any new world, as it unlocks the true potential of what you can build and create.
Now that you have your crafting table ready, you can now explore, mine, and craft your way through the endless possibilities of Minecraft.
Why not take the next step and create your first fence with this article, How to make a fence in Minecraft – A Complete Guide.